The Flo:One system is a comprehensive communications tool. It’s capable of both simple and complex call routing for all deployment requirements. Below details a general overview of how to login, and each of the menus along with what they do!
Navigate and Login to the Web Portal #
Login to the web administration portal. Simply go to flo-one.io and click Login.
For the first time you login, it’ll check you’re happy with communication emails.
Account Settings #
Account settings are where the general settings for your company account are to be found. The specific phone system elements are generally to be found under the “Voice” tab.
Profile #
When logging in, the first page you’ll be met with is the Profile page. Here you can set your Account Image (i.e. Company logo) and enter the Company Details such as the name, contact phone number and Primary Address.

Security #
Security will allow you update your login password as well as set up 2 Factor Authentication (2FA). We strongly recommend having 2FA turned on.
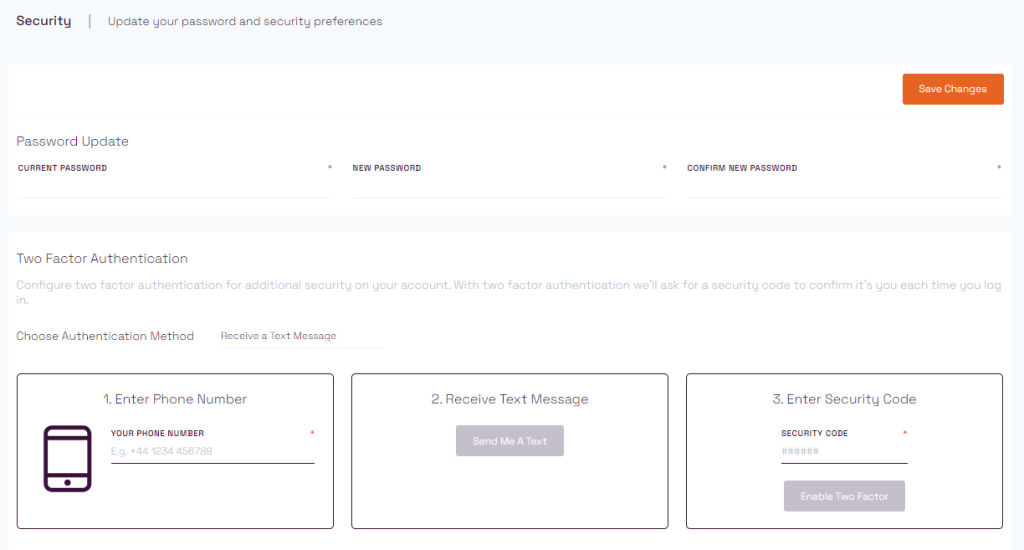
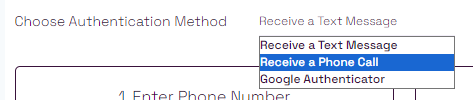
Setting up two Factor Authentication (2FA) #
To set up 2 Factor Authentication, select the method you’d like to use using the drop down box. Note that if you’d like to use Microsoft Authenticator, select “Google Authenticator” and it will work as required.
Address Book #
The Address Book lists the business address(es).
Members #
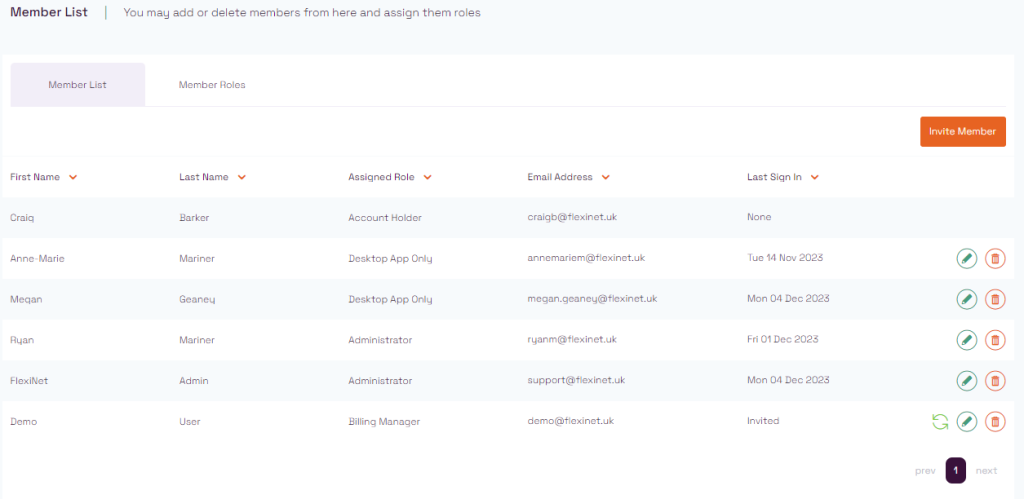
Member List #
Member list details all users who have been granted a level of access to the admin portal.
Note that all users are automatically are given “Desktop App Only” when their email is entered within their user’s extension. This allows them a basic level of self-service.
You can see when the user last signed in, revoke the users access and resend their welcome email using the refresh logo button.
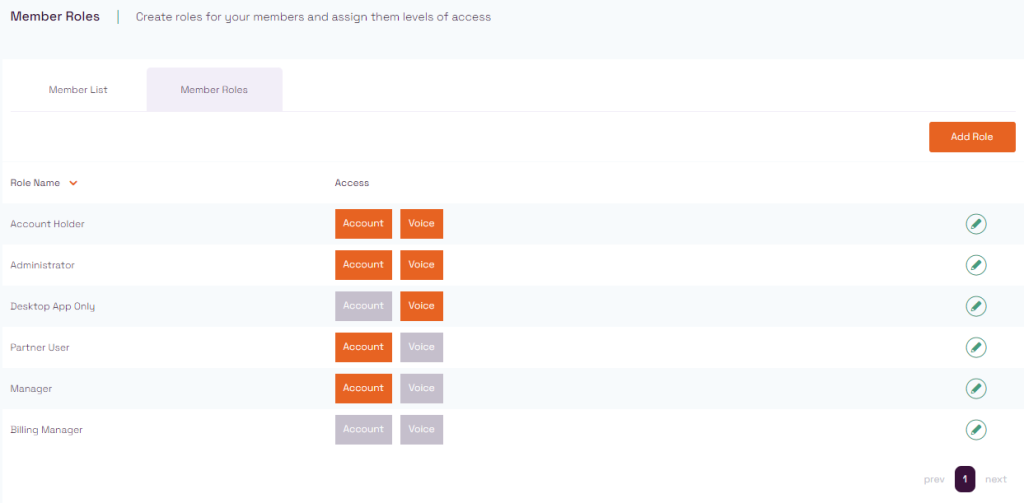
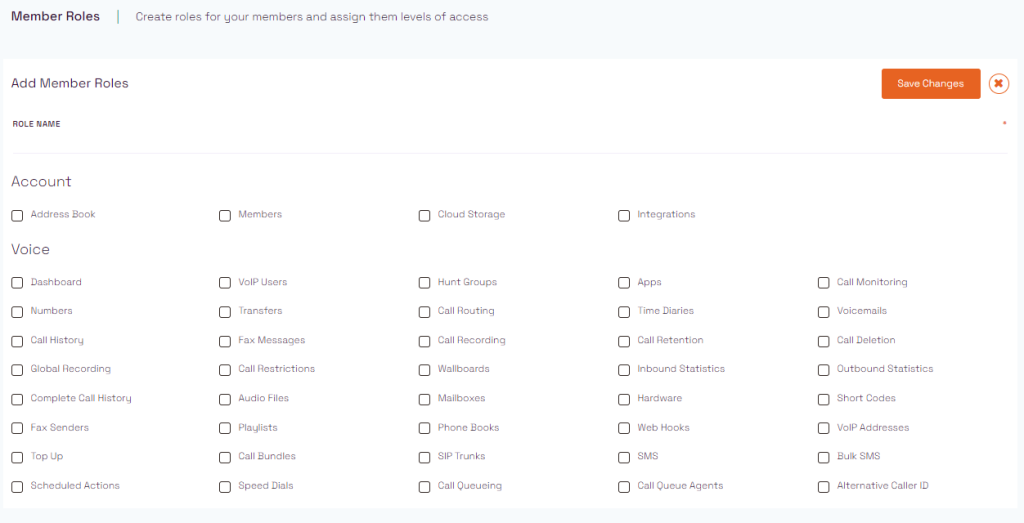
Member Roles #
Member Roles allows you to customise access levels for each assigned role. Note the pre configured options are generally read only, however you can click the “Add Role” button to create your own custom options and then assign them to the users.
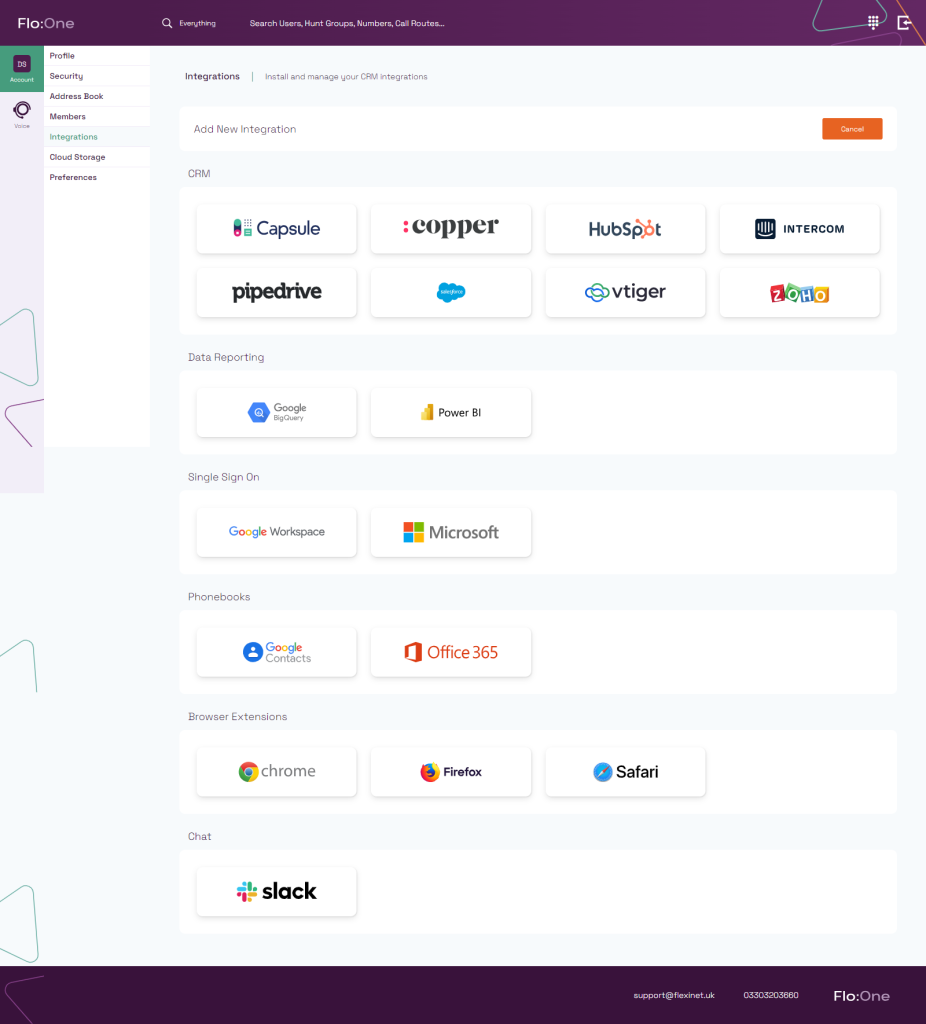
Integrations #
The Integrations section allows you to set up various external system integrations. Simply click on the integration you wish to set up and follow the on screen guide.
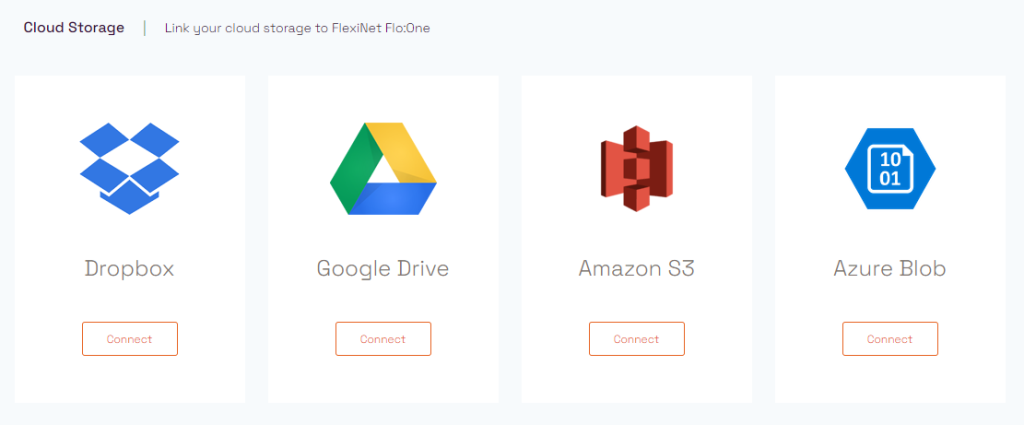
Cloud Storage #
The Cloud Storage section is where you can set up integrations with various cloud storage providers. This enables call recordings and records to be offset to a cloud storage provider such as Google Drive, AWS, Azure and Dropbox.
Preferences #
Under preferences, you can accept or revoke the permission for communication preferences.

Voice #
The “Voice” tab is where you can locate all the phone system elements required to configure your system.
Dashboard #
The Dashboard is a general overview of your system in a snapshot. You’ll see current agents signed in, voicemails saved and any phone number transfers that are going through currently. You’ll also see a snapshot of call history – however, a more comprehensive Call History section is available under the Calls tab.
Apps #
The Apps tab details the Company Code for any companies that are remotely deploying the solution. Here is also where you can authorise users that have signed in using the Company Code as well as listing any numbers associated to users.
Users #
Users #
The users section is where all phone system users are listed and configured. This is quite an in-depth section so we have a guide coming soon!
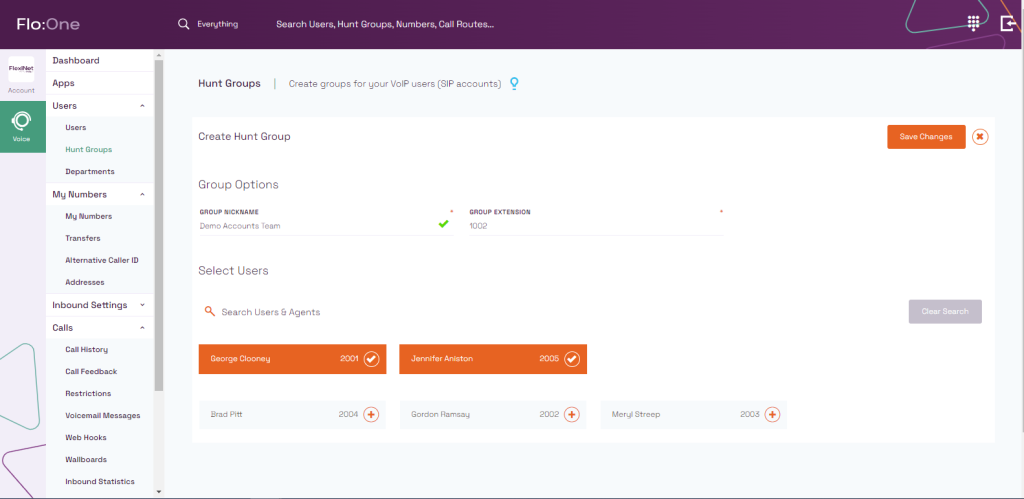
Hunt Groups #
Hunt groups in Flo:One are collections of users. They don’t specifically do anything other than group sections of users together. This is useful as you could add together a specific group of people to use in the call routing.
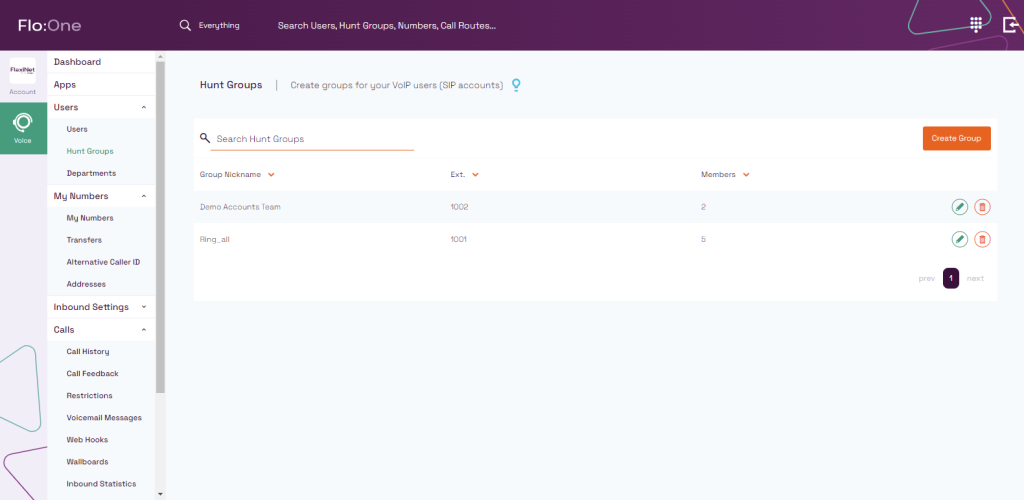
Simply click on “Create Group” to add a new hunt group.
Give it a name, and an extension. We generally advise 1000 numbers (i.e. 1001) for Hunt groups.
Then click on the users you wish to add, and click “Save Changes“
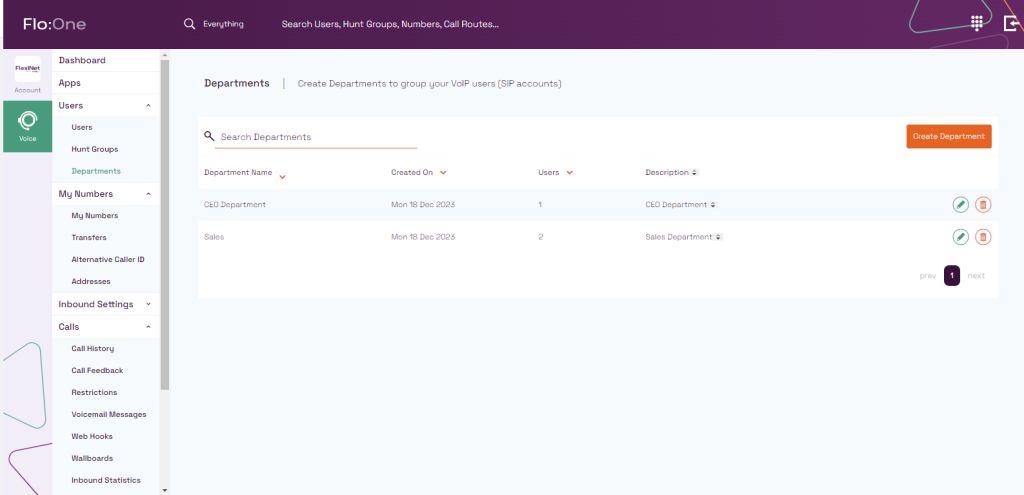
Departments #
Departments are used to collect groups of users together and display them within the apps. This could be different sites, or actual departments. Users can be in multiple departments.
My Numbers #
My Numbers #
All the phone numbers associated to your account can be found under the “My Numbers” section. You can change the destination quickly using the drop down menu under “Routing”. Usually DDI’s go straight to the users, where as the main business numbers typically go to the Time Diary first, before going to the call route.

Transfers #
Transfers lists all the numbers which are (Or have been) transferred into the Flo:One system.
Alternative Caller ID #
The Alternative Caller ID tab is where you can choose to present a different number, not on your account but that you own. To prevent “Number Spoofing”, as a responsible provider, we will ask you to prove some proof of ownership – which is usually just a copy of your current billing for the other number.
Addresses #
The Addresses tab lists all the addresses available for emergency service registrations. Please enter the main addresses at which your phones are likely to be used at.
Inbound Settings #
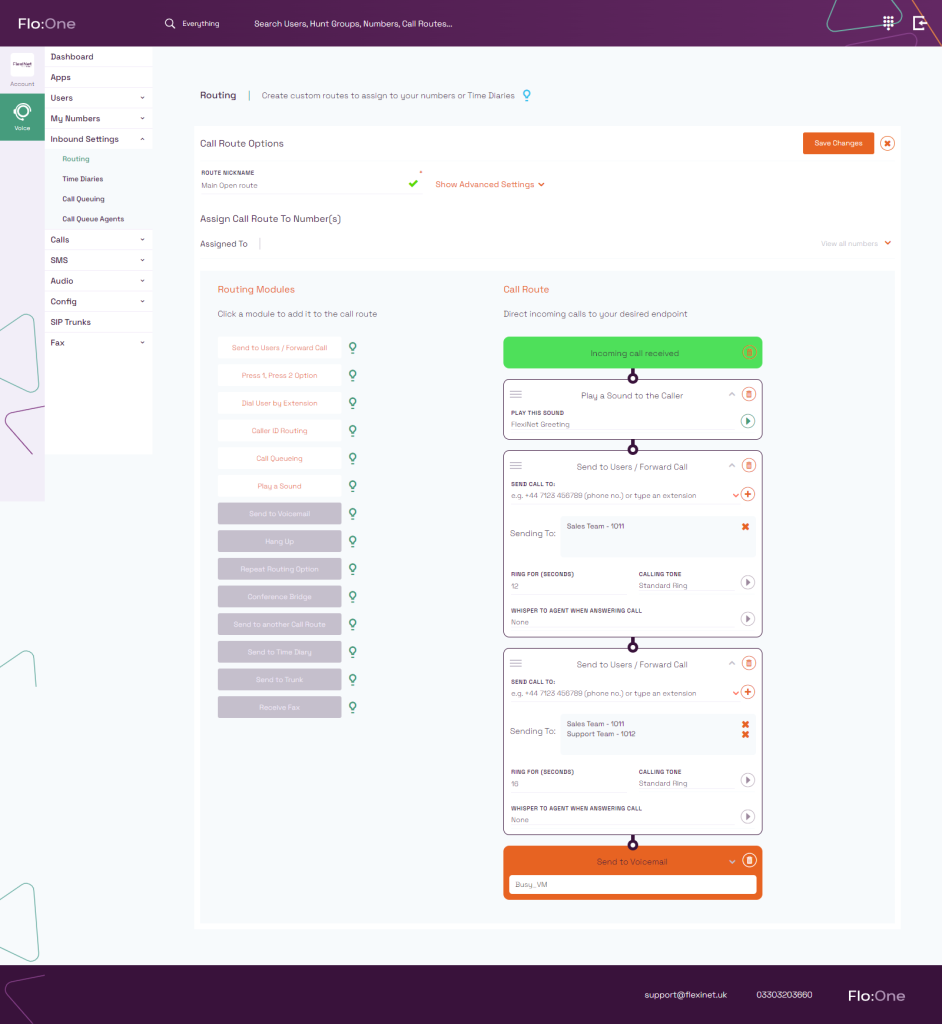
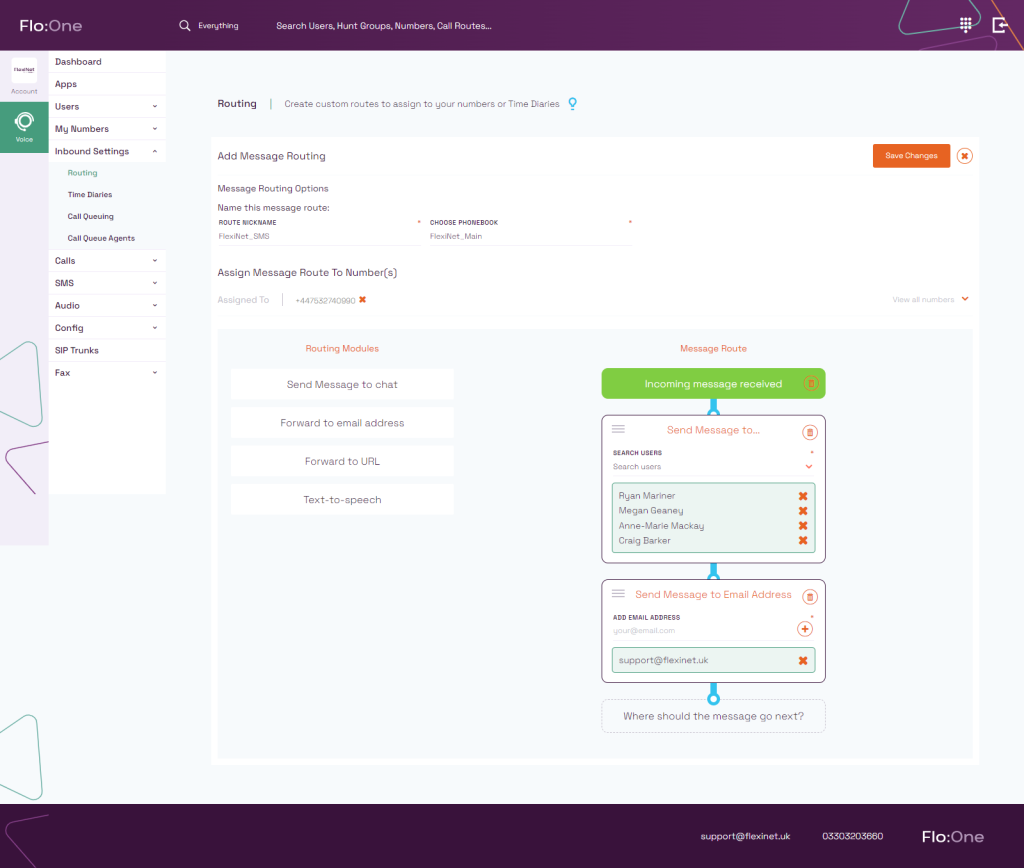
Routing #
The routing section allows you to set up both Call Routes and Message routes (For SMS).
Call Route #
Call routes are the path which a call flows through the Flo:One system.
Typically a call will flow from the number, into the Time Diary, then into the Call Route. Here you can add Auto Attendants, Call queues, Simple Messages and voicemails (As well as lots of other features!)
Message route #
#
Like Call routes, message routes are the path which a text message flows through the Flo:One system.
In general, you select the users you want to receive the message.
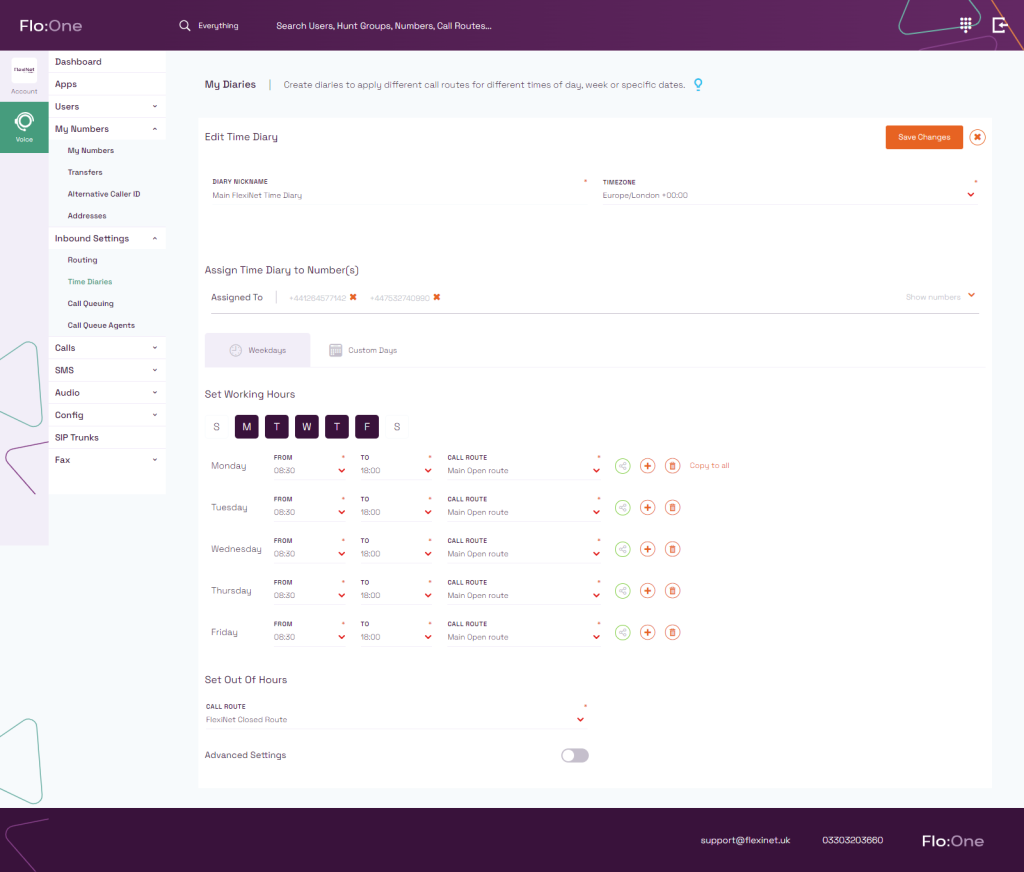
Time Diaries #
Time Diaries usually used as the first line filters for calls coming into the system. Direct a Number straight to a time diary, to allow you to send calls to different places automatically based upon the time of day.
For instance, from 9:00 – 17:00 Monday to Friday, send calls to “Main Call Route” and at any other time, send them to “Out of hours Call Route” which may be a voicemail stating the business is closed.
Call Queuing #
Set up inbound call queuing here.
Call Queue Agents #
Under the Call Queue Agents you can add extra “Agents” which work along side the users extension, to allow them to sign in and out of queues, separately to their main extension.
Calls #
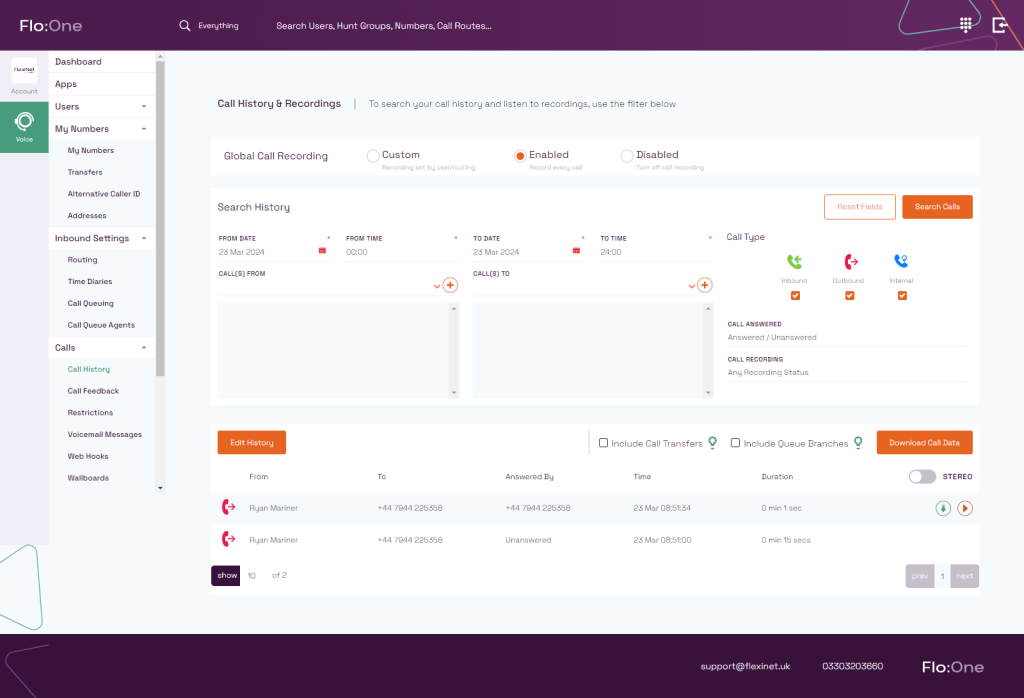
Call History #
Call history is a comprehensive guide to all calls coming in and out of the Flo:One system. Here you can listen to call recordings, download call recordings as well as redacting call data for GDPR.
Call Feedback #
The Call Feedback section allows you to review all the feedback that Flo:One users have entered after each call, as well as seeing call recordings.
Restrictions #
Under Restrictions you can customise what calls are allowed in and out of the Flo:One system. This includes limiting calls based upon a Pence Per Minute rate, or blocking numbers calling into the system (i.e. persistanct cold callers!)
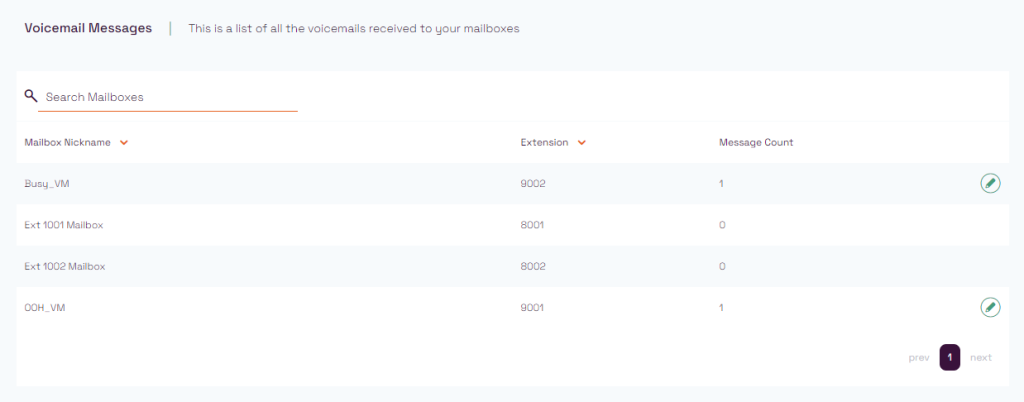
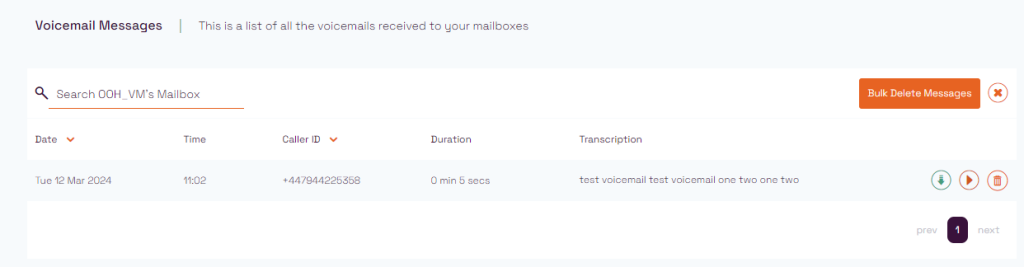
Voicemail Messages #
Under Voicemail Messages you can view and listen back to any messages which have been left for users within the Flo:One system. The initial page lists all the mailboxes, if messages are present, click the “Pencil” button to open that mailbox and view its messages. A transcription is available here, and you can listen or delete the message too.
Web Hooks #
Here you can enter URLs to receive web hooks upon receiving, answering, or ending calls.
Wallboards #
The Wallboards tab allows for URL based wallboards to be created for both inbound and outbound calls.
Inbound Statistics #
Use the Inbound Statistics section to view call data for both individuals and groups. You can also schedule call reports to be emailed to users from here too.
Outbound Statistics #
Use the Outbound Statistics section to view call data for both individuals and groups. You can also schedule call reports to be emailed to users from here too.
SMS #
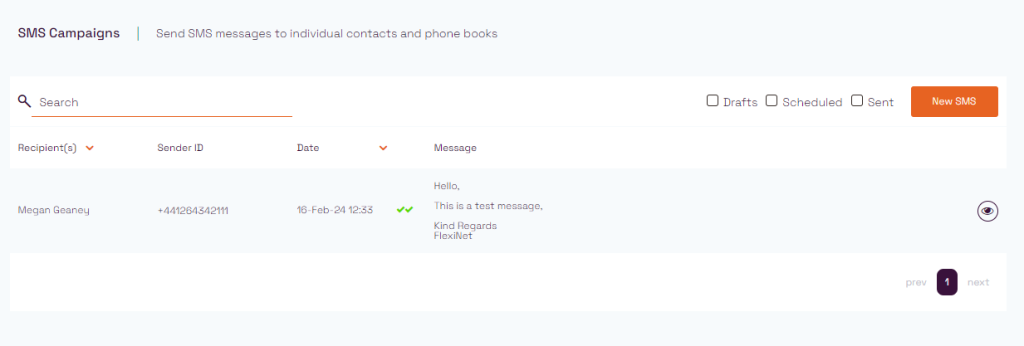
Campaigns #
The Campaign section allows you to configure marketing or broadcast messages from the Flo:One system.
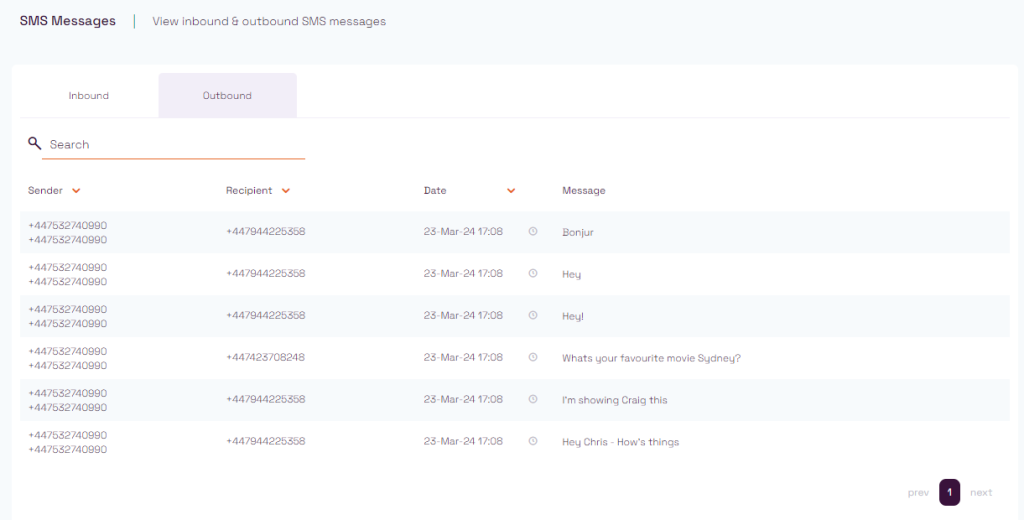
Messages #
The Messages tab records all the SMS messages both in and out of the Flo:One system.

Audio #
Audio Files #
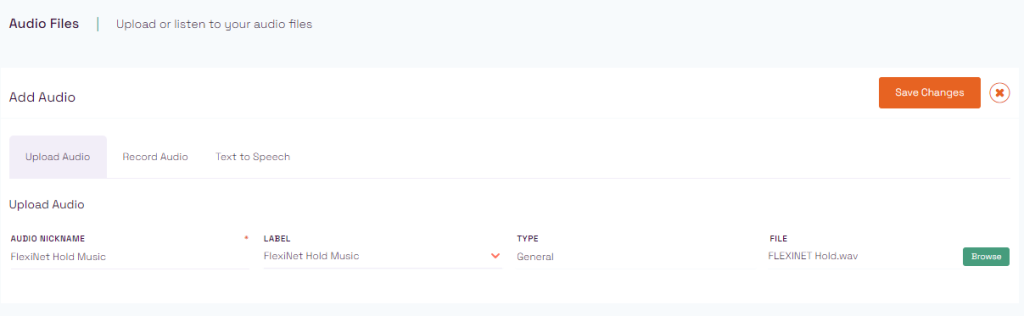
Audio Files is the home for all audio within the system. Here you can save voicemail messages, audio tracks for hold music and messages for Auto Attendants (IVRs).
Add new audio by clicking “Add Audio” button, then name the file (i.e. “Hold Music”) and browse for the file, then save the changes.
Playlists #
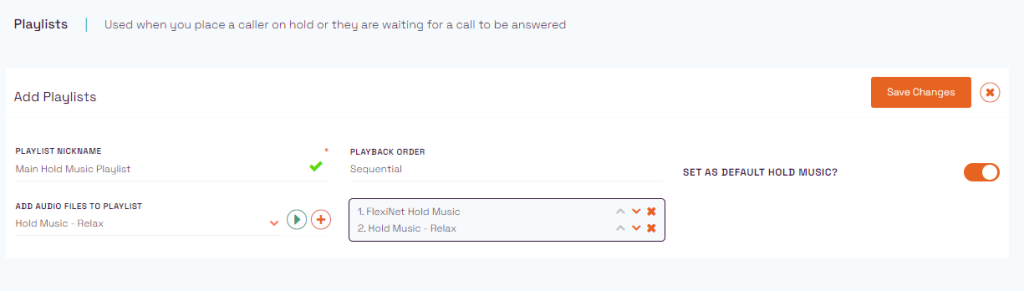
The Playlists section is where you can configure sets of audio together for Music On Hold. After uploading a track (Or multiple) under the “Audio Files” section, create a new playlist select that track and save. You can then select that playlist within the extension of the user.
Config #
Phone Books #
You can configure multiple Phone Books within the phone book section.
Hardware #
All hardware is added and configured within the Hardware section.
Mailboxes #
Mailboxes is the configuration element of the voicemail system. Here is where you can create new mail boxes which callers can leave messages in. Set the email address and request the transcription here.
Short Codes #
Star Codes are shortcut commands in the system to carry out various tasks. They can be configured however you desire, however a default set up is shown below.
| Star Code | Command |
| *11 | Park or resume a call in parking slot 1. |
| *12 | Park or resume a call in parking slot 2. |
| *13 | Park or resume a call in parking slot 3. |
| *14 | Park or resume a call in parking slot 4. |
| *15 | Park or resume a call in parking slot 5. |
| *20 | Log in as a call queue agent |
| *21 | |
| *30 | Page a hunt group |
| *31 | Listen to extension |
| *32 | Whisper to the user on an extension |
| *33 | Join a live call taking place on an extension |
| *35 | Modify Outgoing Caller ID to +441264123456 |
| *50 | Record a new audio file |
| *55 | Pause and resume call recording |
| *80 | Pick Up any incoming call |
| *88 | Pick Up an incoming call to an extension |
Speed Dials #
Speed dials are shortcodes which allows you to dial a short number, but dial a predefined longer number (i.e. #001 dials 03303203660). You can import lists from an excel document in bulk if an older list exists.
Scheduled Actions #
Here under Scheduled actions, you are able to adjust call routes in advance. Click the “Play” button to carry out the schedule immediately.

SIP Trunks #
The SIP Trunk section details the SIP Trunk information for the Flo:One system. Of note, it shows the IP addresses being used by the system.
| SIP | SIP Ports | RTP | RTP Ports (UDP) |
| 34.105.170.20 | 5060 – 5061 | 35.246.34.97 | 10000 – 40000 |
| 35.242.140.109 | |||
| 34.105.214.80 | |||
| 34.105.209.181 |
Fax #
You are able to send and receive faxes through the Flo:One system.
Fax Messages #
The Fax Messages section shows Faxes that have been sent or received into the Flo:One System.
Authorised Senders #
Under the “Add Fax Sender” button you’re able to add Authorised Senders to a list so they’re able to email into the Flo:One system, which will enable them to send a Fax onto a fax machine.


