PulseHD user guide for the WebRTC #
Welcome to the PulseHD user guide, where we provide a step-by-step walkthrough on setting up PulseHD to be used through a web browser. Accompanied by an instructional video, this guide ensures a smooth setup process, enabling you to leverage the full capabilities of PulseHD efficiently.
Video Guide Overview #
Our enclosed instructional video provides a detailed guide on various features and functionalities of PulseHD. Below is a timestamped overview of the contents, which you can refer to for quick navigation:
| Time | Topic |
|---|---|
| 0:00 | Intro |
| 0:23 | Logging into the Web RTC Client |
| 0:43 | Logging in using your mobile number |
| 1:00 | Logging in using the QR Code from a mobile app |
| 1:22 | Logging in using an email and password |
| 1:37 | Overview of the Flo:One Application |
| 1:49 | Turning DND on and off and signing in and out of queues |
| 2:12 | Phone system overview |
| 2:33 | Making a contact a favorite |
| 2:42 | Contact statuses and features |
| 3:20 | Camping on a call, to call when available |
| 3:36 | Listen, Whisper and Join Calls (Barge) |
| 4:30 | Calling a contact |
| 4:43 | Searching and filtering contacts |
| 5:15 | Changing the Direct Dial (DDI) you’re using |
| 5:22 | Call History & Missed calls |
| 5:56 | How to make a call on Flo:One |
| 6:35 | Controlling the call on Flo:One |
| 7:20 | How to put someone on hold and retrieve them on Flo:One |
| 7:22 | How to transfer a call |
| 8:04 | How to park a call on Flo:One |
| 8:15 | How to retrieve a parked call on Flo:One |
| 8:20 | Transferring a call to a mobile app, desk phone, or PC app |
| 8:40 | How to end the call |
| 8:45 | Chat messaging, group chat, and SMS |
| 9:24 | Sending your first SMS |
| 9:48 | Settings overview, including DND, Dark & Light mode, etc. |
| 10:25 | Setting up your phonebook & CRM integration |
| 10:37 | Setting up Audio Settings |
| 10:54 | Changing the Line Key buttons on a Yealink phone |
| 11:10 | Summary |
Installing and logging into the app #
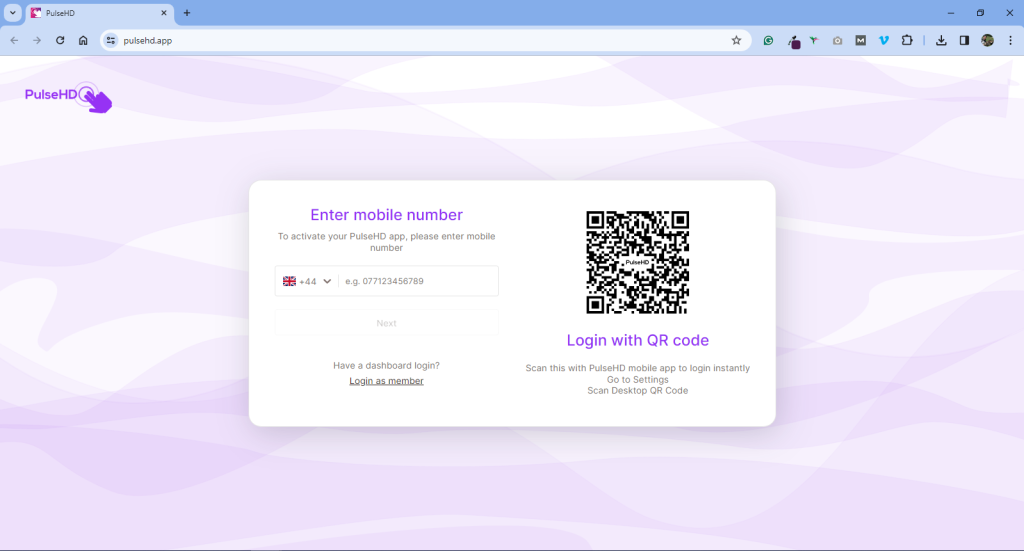
Open your browser & navigate to the PulseHD.app website #
Open Google Chrome or Microsoft Edge* and visit the website pulsehd.app.
(*Other browsers such as Firefox are currently unsupported. Please use the downloadable application here)
Sign in #
Signing in using a Mobile number #
The easiest way to sign in is to use the mobile number associated to your account. Simply enter the number, and a text will be sent to your mobile. Enter this code and you’ll be signed in.
Sign in using an email and password #
Click “Login as a member” and enter the username and password associated to your account.
Sign in using the QR Code #
Open the mobile application (After it’s been downloaded and signed into!), click the QR code within the “More” section, then scan the QR code on your PC.
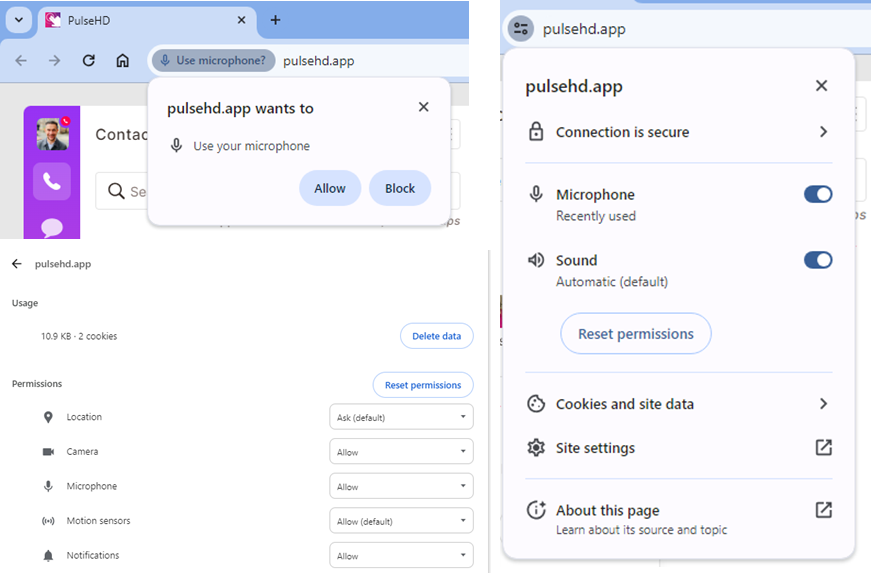
Grant the browser relevant permissions: #
Allow the page access to your microphone, notifications and camera to ensure fully functioning service. These will often pop up, however, you can check these by clicking on the configuration button, and then navigating to “Site Settings“. From here, you can select “Allow” to Camera, Microphone and Notifications.
Using the app #
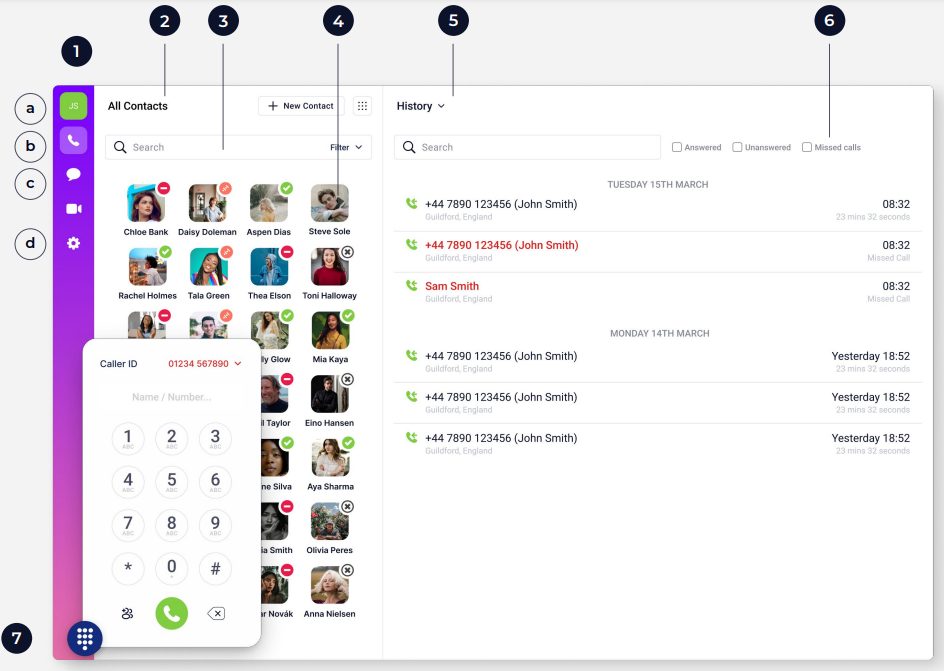
Calls and Contacts View #
1 – Menu Bar – (A) User Settings, (B) Calls, (C) Chats, (D) Settings
2 – Contacts section
3 – Search Contacts
4 – Filter by Internal, Phonebook, Department or Hunt Group
5 – Change Caller ID
6 – Call History section
7 – Search Call History
8 – Filter Inbound, Outbound and Internal
9 – Dialpad – opens on click
Call Handling #
Calls can be placed by clicking on the green phone icon next to a Contact or Call History event in the app.
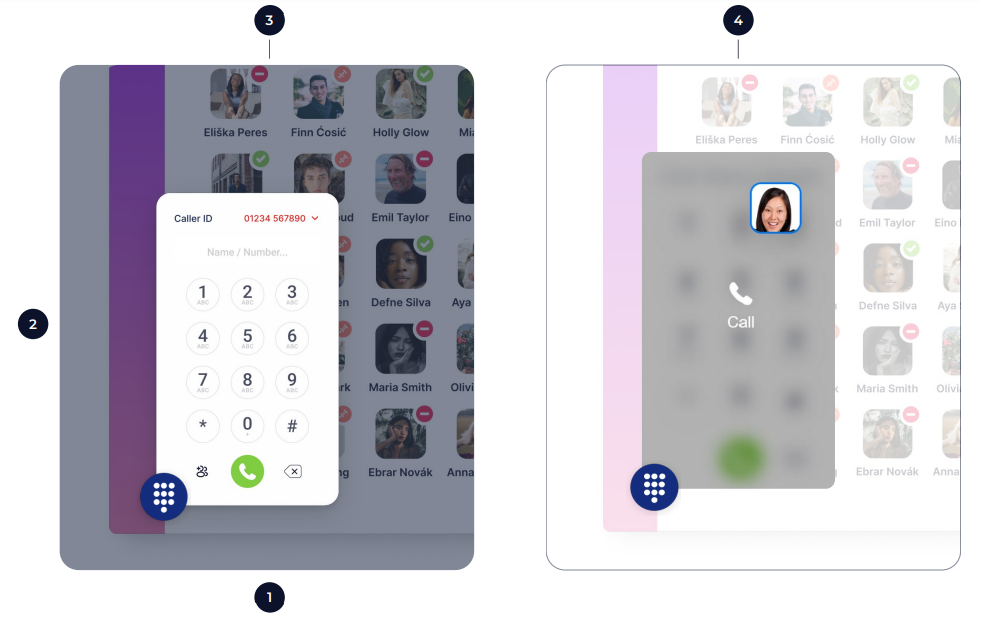
Dialling a number #
You can dial a telephone number manually by opening the dialpad in the bottom left-hand corner (1). Input the number you wish to dial using the number keys and then press the green phone button at the bottom of the dialpad to place the call.
Changing the Caller ID #
You can select the Caller ID (2) that you want to display on the outbound call using the drop-down box on the top-left hand corner of the dialpad.
Use the app to initiate a call on a different device #
You can use the dialpad to place a call from another device that is registered to your extension by selecting the Device from the drop-down in the top right-hand corner. (i.e. dial out from the Desktop, speak through a mobile or desk phone)
Make Internal Calls #
You can also initiate calls to your internal contacts by simply dragging and dropping their profile picture from your Contact list anywhere onto your dialpad. Alternatively, right click on the user and click call.
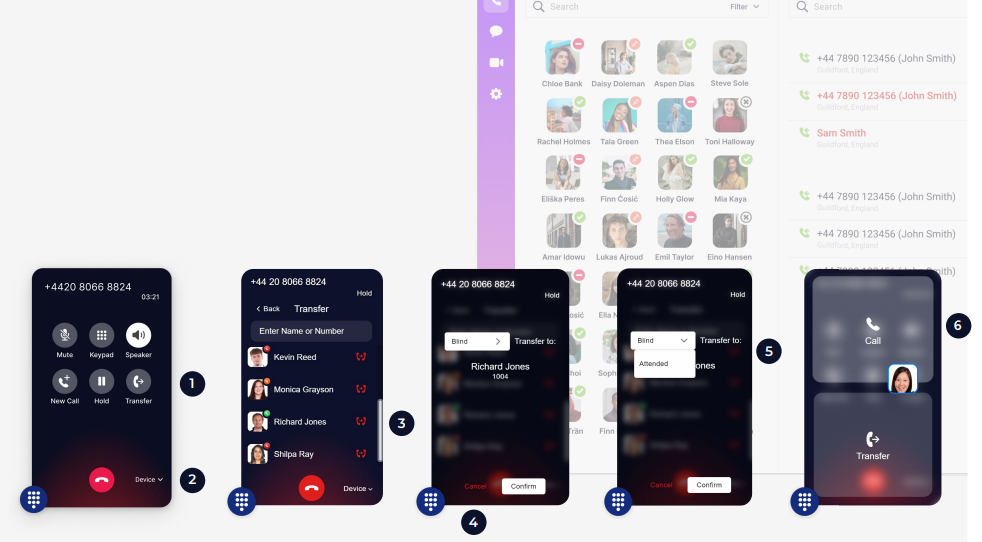
In-call options and Call Transfer #
When on a live call (1), you can Mute your microphone, bring up the Keypad for DTMF/short code input,
switch the audio output to Speaker and initiate a second call by pressing Add Call. You can also place a live call on Hold or Transfer the call to another user.
Call Transfer #
To transfer an active call, press Transfer to bring up a list of contacts (3), then select the user you wish to transfer the call to or enter a name or external number in the box provided. Alternatively, you can drag and drop a contact (6) within the directory into the active call to initiate the transfer or start a new call with your colleague.
You will then be presented with the transfer method and destination which you can Confirm at the bottom of the dialpad to initiate the transfer process or Cancel to return to the original call.
You can choose the call transfer method (4)
Blind #
Pass it straight to the other person with no prior conversation or
Attended #
Speak to the other person to confirm they can receive the call) from the drop-down box provided.
Note: Your default Transfer method can be changed by going to Settings > Calls > Transfer Preference.
Handing the call off to another device #
If you have multiple devices registered to your extension, you can switch the device that you are having a conversation on mid-call using the Device drop-down in the bottom right (2). Click it, and select a different device to speak through (i.e. pass the call from the Desktop app to the mobile app).
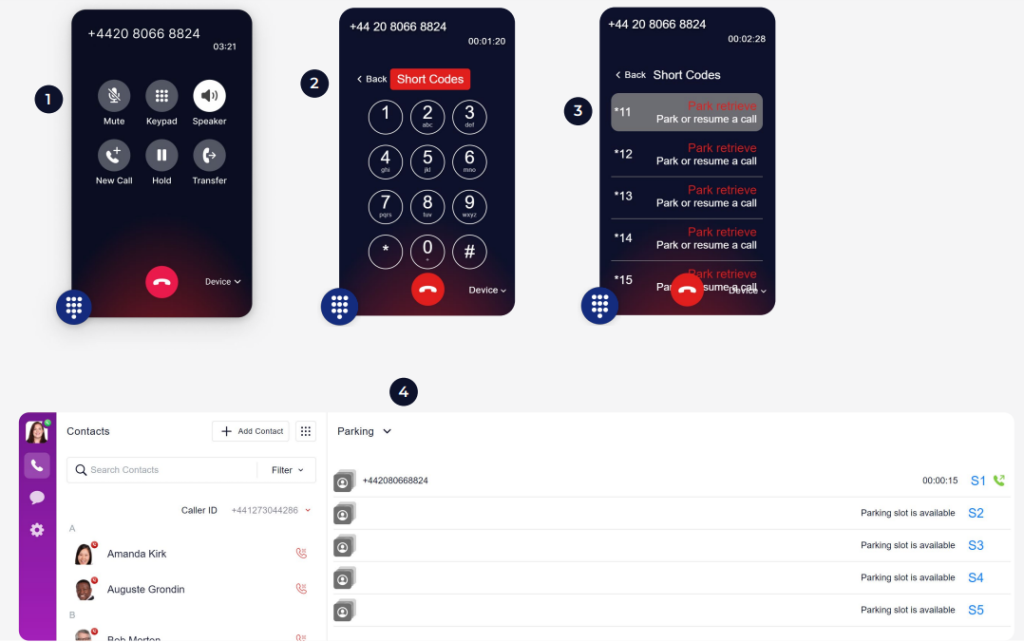
Parking and retrieving a call #
When you park a call, the caller is placed in a hold bay until you or another person takes the parked call out of its parking space. Anyone can park or unpark a call, so it’s a popular way of transferring calls in a small office where you can see each other. “Hey Richard, there is a call for you parked on 1!”
Note: The default short codes to park/retrieve a call are *11 (for parking Space 1), *12 (for parking Space 2), *13 (for parking Space 3) with *14 and *15 for Spaces 4 and 5.
Parking a call #
To park a call, press and hold the “Hold” button and the call will be parked on the first available bay.
Alternatively, you can either dial the pre-configured short code for the parking space you wish to park the call in or click Short Codes to bring up a list of actions (2).
This will present you with a list of short code actions including available parking spaces. Simply select the parking space you wish to use from the list. (3)
Retrieving a parked call #
The call will be displayed in the Parking area of the app (4) and can be retrieved by clicking on the green phone icon next to the parked call.
Chat and SMS view #
Press the Chat icon from the Menu bar on the left to access the chat area of the app.
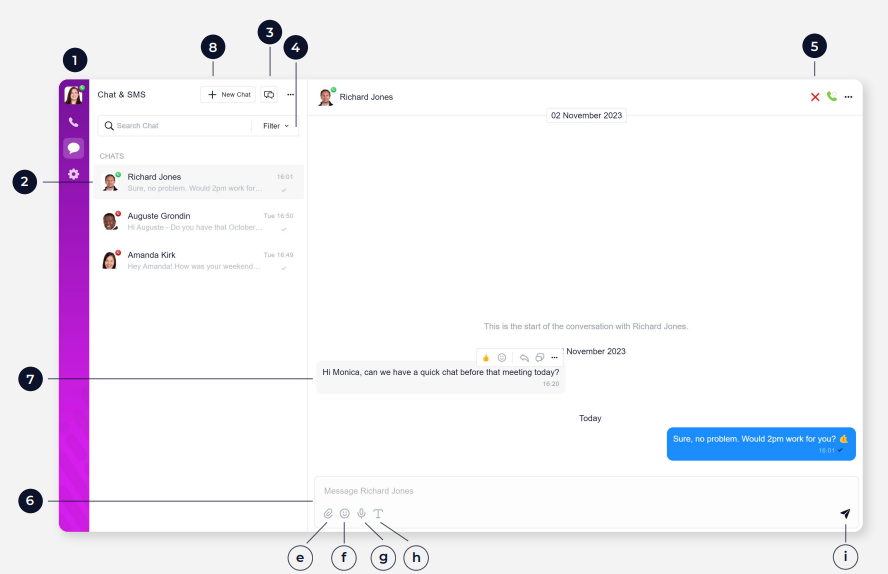
1 – Menu Bar
2 – List of active Chats and SMS conversations
3 – View chat threads
4 – Chat Filter (Filter Read, Unread, Pinned, Muted and Type)
5 – Close the chat with the “X”, Call the Chat Contact by clicking on the green phone icon or view chat information by clicking the ellipsis.
6 – Chat input box
e – Attach file
f – Add Emoji
g – Record voice note
h – Advanced formatting options
i – Send button
7 – Reply options
8 – Start new Chat
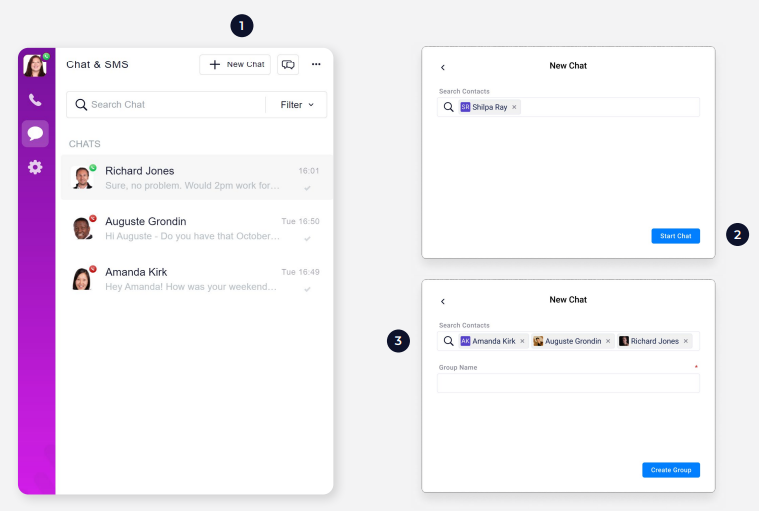
Starting a New Chat and creating Chat Groups #
To begin a new chat with a Contact, go to Chats from the menu on the left and select + New Chat (1)
A pop-up box will appear to Search Contacts (2). Enter the name of the individual you wish to chat with and click Start Chat to begin chatting. You can also search for an existing Chat Group to join.
To create a new Chat Group, simply add more people in the Search Contacts area (3). You will be prompted to create a name for your group and you can then click Create Group to begin chatting.
Note: If you’re in a group with someone, you can mention them in a message by typing the “@” followed by their name.
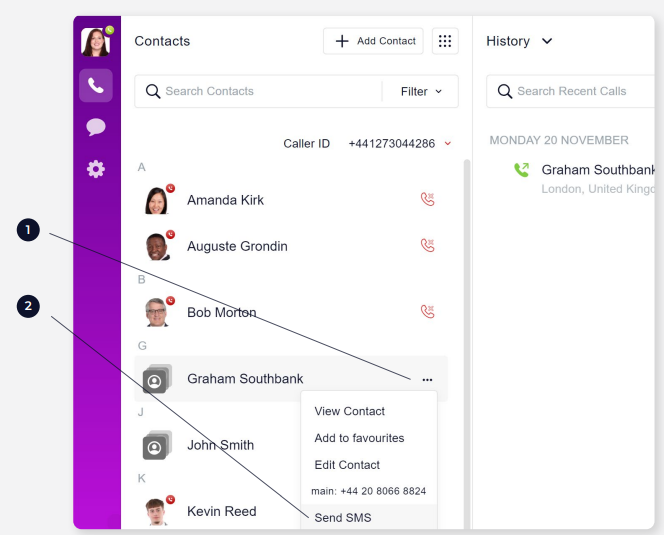
Sending SMS #
To send an SMS, click on the ellipsis next to a Contact (1) from the contact list.
Select ‘Send SMS’ (2). This will start a new chat in the Chat section of the app. Sending and replying to SMS messages works in the same way as a regular chat outlined in the previous section of this guide.
Note: In order to send an SMS, an Outbound message Caller ID needs to be set in the Chat settings of the app.
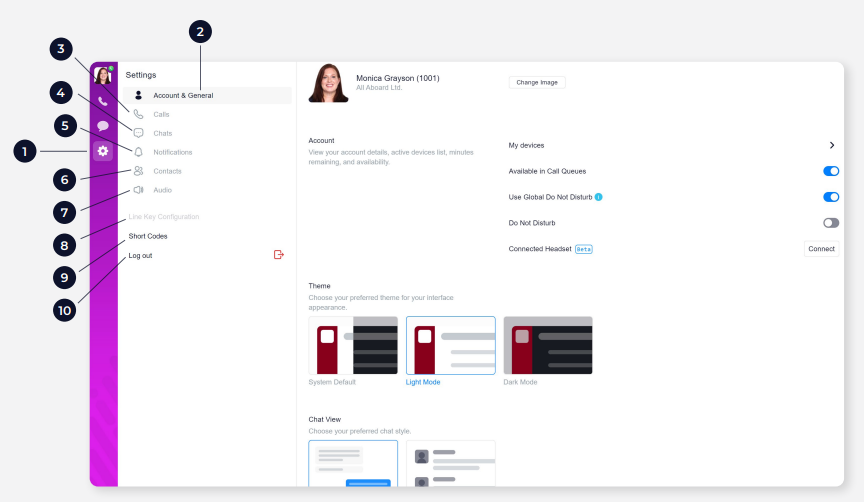
Settings #
You can adjust the app settings, configuration and set preferences in the Settings area of the app (1)
Account and General Settings #
Here (2) you can change your Profile picture, DND devices, change your theme (Dark vs Light mode) and adjust your chat view i.e. condensed or more spread out).
Call Settings #
Under Calls (3) you can select your default Caller ID, toggle call Recording (if it’s not been locked by the administrator), Click to Dial settings, Call Waiting, Forward Calls, set Call Transfer and Park preferences.
Top Tip: We recommend setting your Call Transfer preference to “Attended” here and ensuring the Press hold to park preference is on.
Chat #
Under the Chat section (4) you can tweak your Chat Settings and set the SMS Caller ID (Number shown when sending SMS’s).
Notification #
The Notification Settings (5) allow you to adjust chat notifications and volume.
Contact #
The contact settings (6) section allows you to set preferences for sorting contacts, choose Phonebooks, CRM contact pops.
Top Tip: We’d recommend selecting your business phone book here, and you must select your CRM settings here if you wish to use the integrations.
Audio #
Audio Settings allows you to tweak the default volume as well as selecting the input/output devices.
Top Tip: We recommend you select your laptop speakers for the “Ringtone & Loudspeaker” but select your headset for the In Call Audio & Input Devices.
Short Codes #
Short Codes (9) will present a list of short codes that will allow you to quickly enable/disable features by dialling a short sequence of digits. This may be parking a call, start/stop call recording or opening and closing lines.
Line Key Configuration – (Customising the buttons on a Desk Phone associated to your account) #
This area of the app (8) is really useful if you have a desk phone associated to your account as you can tweak or set up the speed dials and BLF keys (Busy Lamp Field). Simply type or drag and drop contacts and any short codes onto the buttons on the desk phone.
Logging out of your account #
Click Log Out (10) to log out of this specific device.